

How to Plan an Approval Process

At Drivechain, we work with many companies implementing approval processes, especially within the Advanced Approvals module of Salesforce CPQ. This experience has shown us the different ways people approach building approval processes, equally importantly, how they display them. In this blog, we will review our suggested approach to both elements.
So, let’s imagine you have an existing kind of approvals process, but maybe it isn’t managed systematically. This risks significant discounts slipping through at the end of the month or even sales being lost due to discounts that could be offered not being offered. Issues like this should lead you to look at making approvals transparent, system-controlled and shown in your CRM for guidance when selling. After all, your CRM should be a tool used in real-time, not an admin task!
First, you need to understand the basics of your requirement, ie:
Which departments need to approve? This could be RevOps, Sales, Finance, Legal or even the CEO.
When do they need to approve? This could be before a quote goes to a customer, before the Opportunity is considered Closed Won, or even before a Lead is considered sales qualified.
What field values trigger the need for approval? This is often triggers such as discount %, certain products being sold, or changes to required T’s & C’s. This will be very specific to your business, but please try to look forward rather than being controlled by your organisational scar tissue.
In each department, who can approve, and in what order? Taking Sales as an example, a certain level of discount may require no approval; a manager may then approve up to a set % and then a Regional Manager up to another %.
You may notice this can be distilled down to the who, what, when of approvals.
Once you understand your requirements, I would recommend that you map out the desired process. Here at Drivechain, we are massive fans of LucidChart to help with this process. As well as the ease of LucidChart, you can also use the ‘Salesforce Architecture Diagrams’ Shapes and the ‘Flowchart with Swimlanes’ template, which are very helpful. You are also able to use tabs to show different and/or historical information. This empowers you to build the flow in bite-size sections, making sign-off for each section quicker. We recommend using four sections, these are:
Section 1: Basic process.
Start at the beginning and build for each department. Make it very descriptive with distinct endpoints. An Example of a Basic Sales Process Flow is:
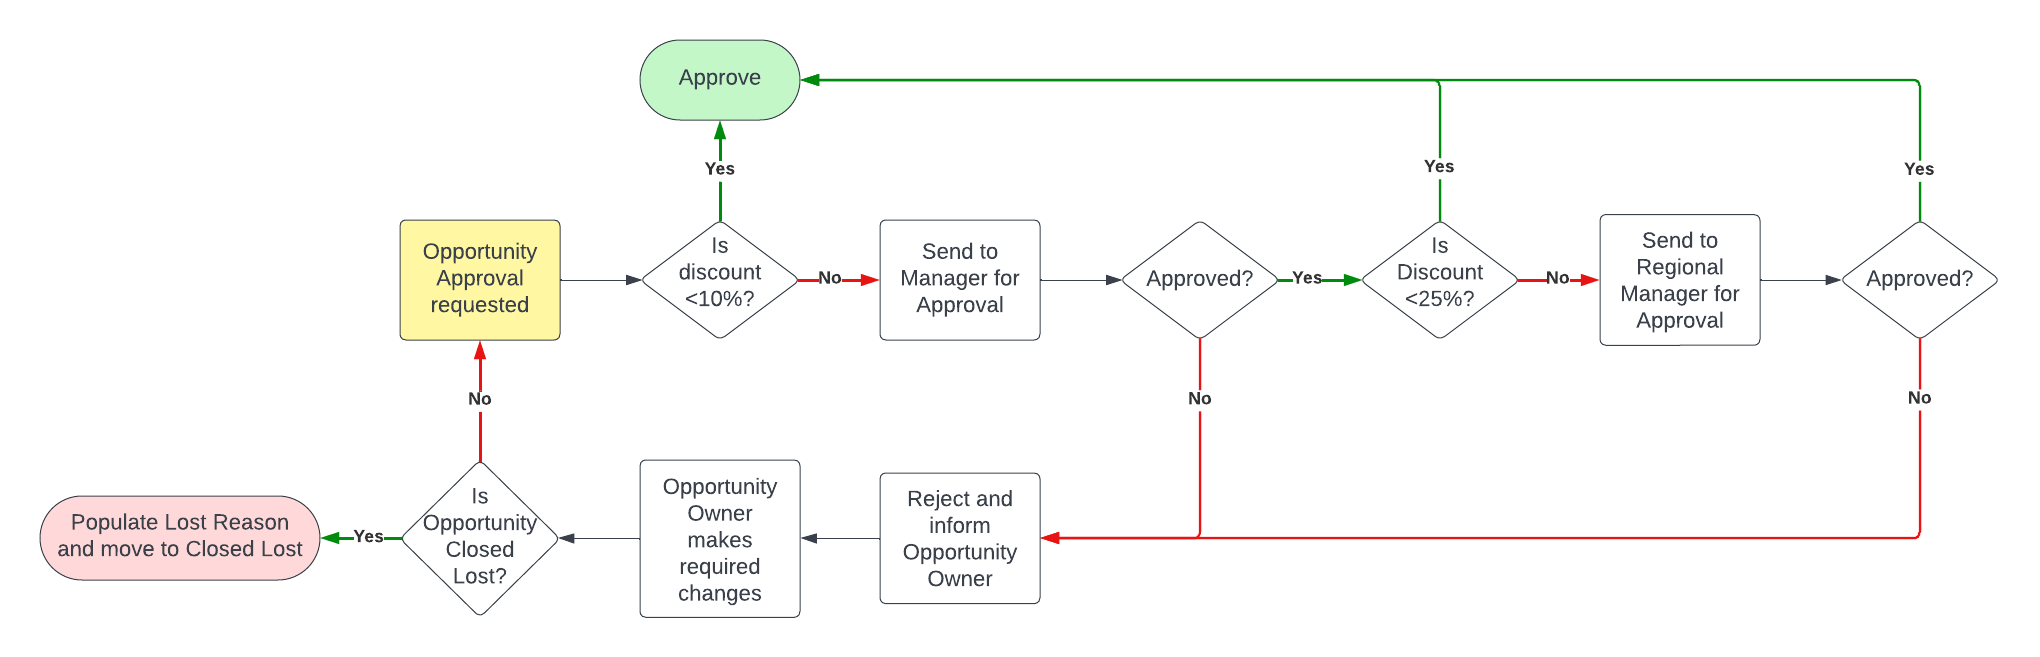
As you can see, this is easy to read and map out the steps. This might get more complex in other examples with multiple steps, but you should not shy away from the complexities. An overly complex flow diagram often leads companies to streamline their processes and shed organisation scar tissue which is good for everyone. Here is an example of a Basic Legal Process Flow which is slightly more complex:

The important thing is that all decisions are named as such and have both ‘Yes’ & ‘No’ outcomes and that numbers are distinct, preferably relating to your CRM fields.
Section 2: Real Life Examples.
Run through real examples with the end Users as well as management to ensure that the flow matches real-life scenarios and business requirements.
Section 3: Discussions.
Discuss and decide when reapproval should be required, I.e., if changes occur after approval. It is not unusual that this happens, especially if approval takes place early in the sales process. The Salesforce Advanced Approvals tool, part of Salesforce CPQ+ licences, has facilities that ensure that only people who need to reapprove are asked to. For instance, in the examples above, let's say that extended payment terms had already been signed off by legal, and then the discount had changed from 5% to 40%, but the value is still over £10,000. At this point, the Legal team would not need to reapprove (The salesperson might get a stern talking to though!)
Section 4: One Table to rule them all.
Once you have this decided, I recommend moving your flows into a single table. This should show the different steps, teams, entry criteria, and reapproval steps. It will look something like this:
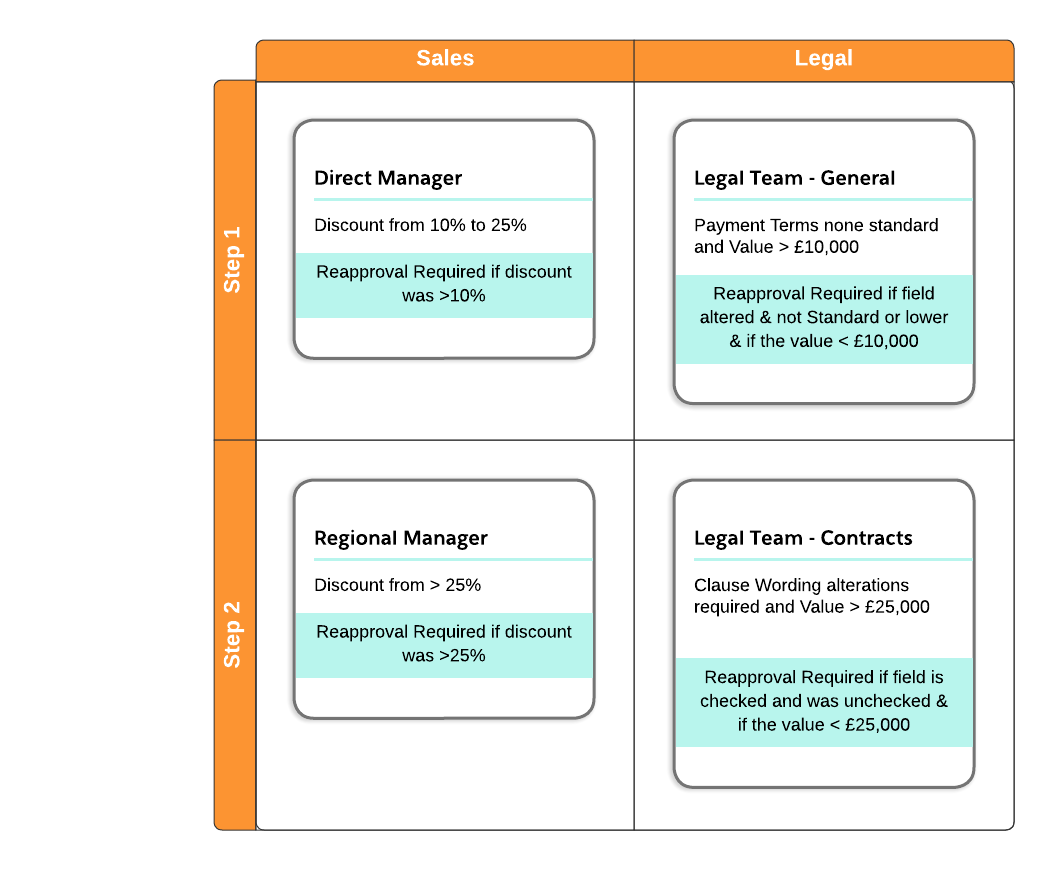
You are now in a great place to implement the solution, so decide on the tool you will be using (e.g. In Salesforce, this might be Standard Approvals, Advanced Approvals, or a custom solution in Flow), spin up a sandbox, and get building.
We wish you the best of luck and, as always, feel free to ask if you have any questions.